Hello friends!
I have something cool to share with you! My first historical outfit with all of the underpinnings and trimmings! I’ll be sharing the underpinnings in my next post, but for now, here’s the exterior. 🙂

Last month we attended a Victorian fancy dress Halloween Tea with the Greater Bay Area Costumers Guild in Niles. I wanted to make an outfit that I could wear again, and not a one-off costume, so I elected for basic pieces in black, which basically gave me a Victorian mourning outfit. As we know, the Victorians seemed to love to mourn and the macabre, and I was certain such an outfit could be worn more times than just once.

My first order of business was constructing the blouse. My “character” is an 1890’s woman living in the California Gold Country. So, basically, that would be the past version of myself.

I used the Buckaroo Bobbins Romantic Era Blouses pattern (OOP) for my blouse, combining the “Calamity Jane” with the “Etta Place” sleeves. I’m not sure why they call this the “Romantic Era” as that era in fashion is generally 1815-40.

I used a black cotton lawn with black eyelash lace, which was incredibly difficult to photograph inside on my dressform. Both fabrics are from Cali Fabrics and featured in my post on the Cali Fabrics site. I underlined the front yoke piece, with the lawn as the lace is quite see-through. Most (if not all) of the lace pieces I’ve seen from this era are not underlined, but I didn’t want my corset cover to show, nor did I want to make a dickey. Underlining it also helped to keep the fragile ends of the eyelash lace together and gave the yoke stability.

The blouse was easy to construct. The armscyes are small, which I didn’t notice until I had sewn the sleeves together. So I had to cut into it and add diamond shaped gussets for movement. The sleeve heads also don’t quite sit on my shoulders like they should, so I will need to fix that the next time I make this blouse, along with enlarging the armscye. I thought the button back would be uncomfortable, but it wasn’t. Probably also as I have a corset on, so I wouldn’t feel the buttons anyway. I measured my neck and made sure that the collar was the right length before I cut it out and sewed it, so it’s also comfortable to wear.

Instead of using lace trim for the collar, I cut a scalloped piece out of the lace fabric and used that. This blouse also gave me the opportunity to wear a family heirloom — my great-great grandmothers’ cameo — which dates back to about the same time period as this outfit. I also am wearing a vintage midcentury lace mantilla of my grandma’s from Spain.

For my skirt, I have on the Scroop Fantail Skirt made out of rayon bengaline. I’ve been planning to make this skirt ever since Leimomi released this pattern and am glad that I finally had the opportunity to. The pattern is also available in a shortened modern version in addition to this historical (1890-1910) pattern.

Source: Scroop Patterns
The bengaline worked quite well for this skirt, although it seems to pull a little on the two side front gores. I think perhaps I need to let the waistband out a little to get rid of the wrinkly appearance there. I did plan on doing that as it’s a bit tight on my dressform, but fits me when I have my corset on.

The Fantail Skirt is a simple pattern to put together, although my back pleats don’t look as neat as the patterns’ sample photos do. Maybe is my heavier skirt fabric or maybe it’s just me and my pressing.

I used less fabric than the pattern suggested for the skirt and pieced the corners, which is something that I can’t even see in the photos and apparently didn’t take any photos to show you either… I added about 2″ to the length of this skirt and then hemmed it after hanging for a few days (or a week or two as I was working on other projects at the same time….). I sewed rayon seam binding to the hem, using it as hem tape and hand sewed the hem (which of course I didn’t take pictures of…).

I tried to look solemn and/or formidable in these photos.

But then there’s one of me with Rollie the photobomber.

I took the mourning photos out in our burned up pastures for some gothic macabre backdrops.

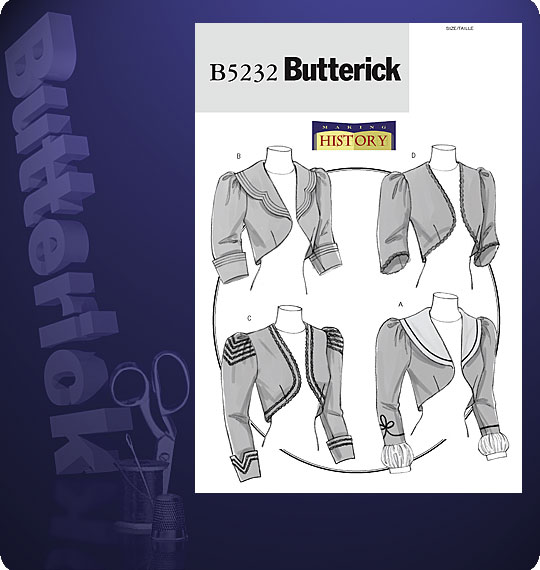
For the Victorian fancy dress tea, I went as a sorceress, adding a jacket and some basted on appliques. I originally had a completely different color scheme planned for this. I pulled a beautiful grey wool/silk tweed out of my stash and made view C of Butterick 5232 (OOP), a Making History pattern. I sewed on some vintage soutache trim and was close to finishing my jacket until I realized that it did not go with my bengaline skirt. The jacket is muted and looks like it goes with a day outfit, while my shiny skirt looks a bit fancier. So I went in another direction with my next jacket version and am saving my WIP wool version to wear with a wool skirt and different blouse that I plan to make in the future.
Source: Pattern Review
For my second attempt at a jacket I went with view A of the same pattern with elongated sleeves. I considered buying some new fabric to make a jacket, but remembered that I had a few colorful plaid fabrics in my stash, and figured that this one would work. It’s a synthetic taffeta and feels like a nylon blend, but I can’t be sure. My MIL passed it on to me with some other similar fabrics. I generally wouldn’t choose a synthetic for a historical piece, but I had it and it worked, so I went with it.

I probably should have straightened out the back pleats on my dressform before taking this photo.
The jacket is lined with a green Japanese poly lining and (YAY!) I matched all of the plaids. It’s a pretty quick jacket to sew up and I’d definitely use this pattern again. I cut out crescent moons and stars of the plaid fabric and basted them on my skirt. I fused interfacing on the pieces and put fray check around the edges before I basted them.

I made a sorceress hat, too! It has a buckram base and is covered with black cotton velveteen. I made a cone hat pattern and cut the buckram out, sewed the buckram pieces together and then covered it with velveteen. I then basted the same moons and stars appliques on the hat that I put on my skirt.

As if I needed another project, on the night before I made a purse to wear with my outfit. I used the Decades of Style 1917 Foxtrot Bag pattern. I was going to just draft my own drawstring purse, but opted to use this one, even though it’s slightly ahead of my time period. It works for me, though. The bag is made out of a remnant of silk faille in my stash and lined with the same plaid tafetta from my jacket. I also used some velvet ribbon that I had.

So there you have it! Two different ways to wear essentially the same pieces. I’ve also been given some other costume ideas for my blouse and skirt like Lizzie Borden and one of the “ghosts” from the Doctor Who episode “The Unquiet Dead.”

Note: I received the fabrics for my blouse at no charge as I am a Cali Fabrics blog contributor.
Happy Sewing!

- Blouse: Buckaroo Bobbins “Romantic Era” Blouses in cotton lawn and eyelash lace, made by me
- Skirt: Scroop Historical Fantail Skirt in rayon bengaline, made by me
- Jacket: Butterick 5232 in synthetic taffeta, made by me
- Purse: Decades of Style 1917 Foxtrot Bag in silk faille, made by me
- Cameo: Family heirloom
- Mantilla: Vintage mid-century
- Earrings: Vintage mid-century

OMG, I love it!!! Just beautiful!
Just awesome.I love black and this is so perfect.So beautifully convertd into new pattern.Liked the strips jacket and stars and moon pattern very much.
What a wonderful skirt and blouse! The bright plaid jacket is perfect, especially with the skirt and hat embellishments. Some of the pix remind me of the movie “The Piano”. If you have seen it, I’m thinking of the shots of the women in the woods.
Very nice- if you plan to make more from this era, I can highly recommend anything by Truly Victorian- their 9 gore skirt is delicious!
So dark and magical! Lovely mourning outfit. I think I have some antique Mourning rings from that period and the brooch is beautiful. Lucky you to have it and that beautiful Spanish lace mantilla. Dapper Rollie can photobomb any time!
Fantastic! Although “mourning” sounds sad, the blouse and skirt are amazing. Beautiful sewing! and I love to hear you explain the alterations so I can remember when I need them! :o) The sorceress costume is amazing as well! I’ve just never seen anyone ever re-create the mourning “dress”! So glad you did!