Mrs. Hughes

Retro Inspired Sewing

  • About
    • About Tanya
    • Featured
    • Contact Me
  • My Closet
  • Tutorials
You are here: Home / DIY Projects / {tutorial} DIY Vintage Thread Spool Wreath

{tutorial} DIY Vintage Thread Spool Wreath

08/29/2013

I had been looking for ways to decorate my sewing room when I came across this wreath on Pinterest.
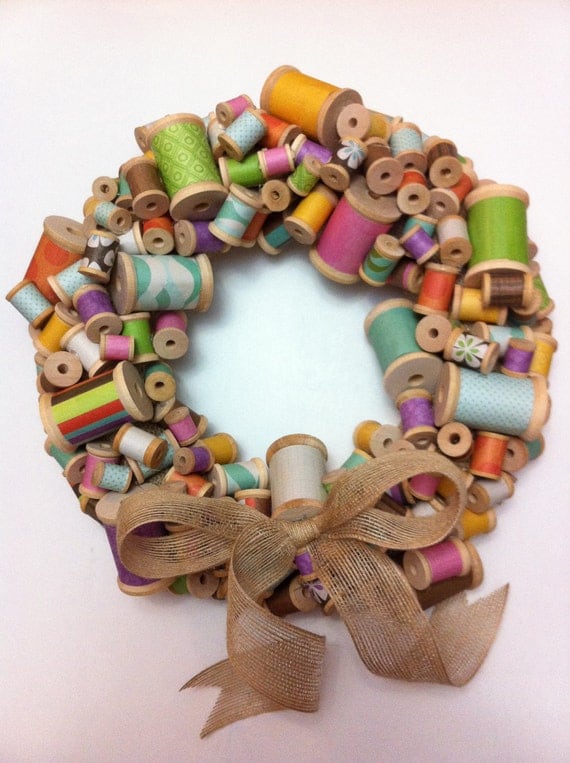
I thought this was a perfect sewing room decoration and was like:  “Hey, I can make that myself!”  This particular thread wreath is made with ribbon wrapped around wooden spools.  It makes it look much fuller and more colorful than mine is.  Mine is kind of more homespun looking as I used actual vintage thread spools.  These all came from my grandma and I probably was never going to use them, but I didn’t want to exactly ruin them either, if I ever needed thread due to a cataclysmic event or something (yes, I watch too many post-apocalyptic movies), I could just remove the spools and use them.  So I actually sewed my thread spools on rather than gluing them on.  This was much more time consuming, but at least I can always use the thread if I need them!

Vintage thread spool wreath

Vintage thread spool wreath

When I started thinking about this project, I wasn’t sure what I wanted to use as the base for my wreath.  I had made previous wreaths with styrofoam bases and they don’t last long as the styrofoam breaks eventually.  I happened to be talking with my MIL while in Joann’s one day and a guy cutting fabric overheard us talking about the styrofoam wreath bases and said that his friend makes them and wraps them with duct tape.  I figured that might actually work and decided to try that!

Vintage Thread Spool Wreath

Supplies

  • Styrofoam thread base
  • Duct Tape
  • Fabric scraps (if you are sewing the spools on, otherwise, use a glue gun)
  • Thread spools (and ribbon if you have empty ones and/or want to cover them with ribbon)
  • Liquid Stitch (if you’re attaching fabric scraps to the base)
  • Thread (if you’re using my method)
  • Glue Gun (if you aren’t sewing the spools on)
  • Ribbon for bow

First off, I wrapped the styrofoam wreath base with duct tape.  You don’t need to use a colored duct tape, unless of course you want to see it.  I just happened to have this purple tape.

Duct tape wrapped styrofoam wreath base

Duct tape wrapped styrofoam wreath base

If you want to hot glue your spools directly on to your base, you don’t need to do the next step.  As I sewed mine on, I needed to have something to sew them to, so I used scrap pieces of muslin and wrapped and affixed  them with Liquid Stitch on to my wreath base until it covered it.

IMG_0256

IMG_0257

IMG_0259

If you went with the fabric strip cover route and used Liquid Stitch, you’re probably going to have to wait until the glue dries.  The next part is assembling your spools.

IMG_0260

If you don’t have any of these spools, don’t worry!  You can buy them on etsy or find them at flea markets and thrift stores.  I bought some more off etsy and my MIL gave me those empty spools you see in front, in case I wanted to wrap any with ribbon.

Next, start sewing (or gluing) them on!  I put larger spools in and then filled up with smaller ones and kept sewing them on until I was happy with how it looked.  It took me a few weeks to make this as I worked on it off and on and also had to wait for the spools that I ordered to arrive.  I think I might make one with the ribbon covered spools at some point.  It would be a smaller one that I’d hang on a door.  This one is pretty heavy!

IMG_0261

IMG_0262

My wreath just hangs on a big nail in the wall, but if you wanted to make a hanger for yours, you would have tied a piece of ribbon/cording/string around the the top of the base and made a loop.  Or you can tie floral wire (or whatever wire you have) around and make a hanging loop.  You would have needed to do this before you started sewing or gluing your spools on.

The last step is to adorn it with a bow.  The inspiration photo has a burlap bow.  I used this lace ribbon I found at Michaels.  You could use anything or go bare.  And voila!  You have a turned some old “junk” into something to decorate your sewing space!

sewing room decor

Happy Creating!

signature

Share this:
  • Share via Email
  • Share via Facebook
  • Share via Pinterest
  • Share via Ravelry
  • Share via Twitter
  • Share via Google

Related

Filed Under: DIY Projects, Home Dec Projects, My Sewing Room, Refinishing "Junk", Tutorials

« August Fabric Finds
Sew Weekly Reunion Pantone Challenge: Emerald Green Voile Dress »

Comments

  1. Anella Nickolas says

    January 27, 2018 at 2:31 pm

    Tanya,
    I just found your charming wreath and have many spools of my mom’s and grandmother’s that I could not throw away. So I’m now going to adapt them into a wreath. Thanks for the great ideas.

  2. Emily says

    October 15, 2017 at 5:03 am

    Beautiful!! I absolutely love your wreath!

  3. Bonnie says

    August 17, 2014 at 6:28 pm

    Thank you for the idea… My mom is 99 years old and in a retirement home.. I make wreaths for her door there.. She always sewed and as we are cleaning out her home we have come across her old spools of thread.. This idea is a perfect and unique decoration for her door…

    • tanyamaile says

      August 18, 2014 at 7:00 am

      Oh, I think your mother would love a wreath like that! I’d love to see a photo, too!

  4. Maria says

    April 9, 2014 at 7:27 pm

    Hi Tanya … I’m a bit confused about how you sewed the spools to the wreath. Could you enlighten me about that? I really like the look of your wreath with the actual thread. Thanks for the information.

    • tanya maile says

      April 9, 2014 at 7:50 pm

      Hi Maria,
      I took a heavy duty needle with some thread (doubled and knotted at the end) and went first through the muslin. Then I put the needle through thread on the back of the spool (like you would do with a needle when you’re done sewing) an then back into the muslin. I did this at least three times for each spool. That’s what took so long with this project

  5. dottiedoodle says

    August 30, 2013 at 3:16 am

    Looks amazing, love it!

    • tanya maile says

      August 30, 2013 at 6:54 am

      Thank you!

  6. Gjeometry says

    August 29, 2013 at 5:40 pm

    Fabulous idea!! This is pretty. You gave me an idea of what to do with empty spools as well (yes, I keep them…..). I could paint them all different colours and then make the wreath. 🙂

    • tanya maile says

      August 29, 2013 at 7:49 pm

      That’s a great idea! I hate to throw those away.

  • Bloglovin
  • Email
  • Facebook
  • Flickr
  • Instagram
  • Pinterest
  • RSS
  • Twitter

Subscribe to Blog via Email

My Favorites

  • The 1920’s Egyptian Revival Gown
  • The Embroidered Zig Zag Dress
  • The 1929 Pansy Dress
  • The 1930’s Silk Velvet Dress
  • Sailors are My Weakness [The Dorothy Lara Dress]
  • The California Poppy Blouse
  • The 1950’s Robin Hood Dress
  • The Broderie Anglaise Birthday Dress

Categories

Archives

“Dress Like Your Grandma” Host

Behind the Scenes on Instagram @tanyamaile

Rollie. #mythoughtsexactly Rollie. #mythoughtsexactly
A finished project! I used McCall 1247 (c. 1946) t A finished project! I used McCall 1247 (c. 1946) to create this blouse. It's made out of a rayon twill that I got from @lafinchfabrics. I started this project pre-pandemic and just finished it... I have been experiencing a lot of sewing lethargy, which isn't unusual considering our current circumstances here in the US. I'm trying to get my sew-jo back as I would just love to sit here all day sewing and watching TV. I have been embroidering and am finding escape in that. ❤️
.
#vintagesewing #mccall1247 #vintagepatterncollector #1940spattern #embroidery #handembroidery #1940speasantblouse
Sandor on the sloth. Sandor on the sloth.
My next embroidery project! I recently scored this My next embroidery project! I recently scored this 1938 State Flower Map embroidery transfer pattern and just spent many hours tracing it. It's going to be the focal point on a quilt that I'm planning to make with vintage handkerchiefs -- most of them from the same era. #embroidery #vintageembroidery #1930sembroidery #stateflowers #handkerchiefquilt #mccall609
My family recently received a new Purple Heart med My family recently received a new Purple Heart medal for my grandpa. My grandpa was a highly decorated and yet modest man and although he was proud to have received his service medals, he did not display them. I found most of them forgotten in a dusty box under his desk after he passed. Others I found in footlockers in the barn. I have yet to find the Purple Heart that he earned while being shot down over France during WWII. He had a bullet in his leg with remnants that remained for the rest of his life. Thankfully, we were able to apply for and receive another one. All Purple Hearts have the recipients name engraved on the back. The last photo was the last medal he received - the Prisoner of War medal (1987). He became a POW after his P-51D was shot down and he was captured by the Nazis. My grandpa and his military brothers and sisters are not "losers" or "suckers". They served the country that they love.
I don't know about you, but I need something to lo I don't know about you, but I need something to look forward to, so today I decorated for Halloween. It doesn't take me very long as I don't have very many Halloween decorations. Time to get spooky!
.
Cleo (and the other cats) just got a spooky castle from Target.
Just a friendly reminder that it is not an Etsy/eB Just a friendly reminder that it is not an Etsy/eBay seller or a small business's fault that a package is delayed due to the USPS being a political pawn. Please be patient. Contact your federal representatives. Don't be a Karen.
Getting a head start on Halloween decorating as I Getting a head start on Halloween decorating as I both love spooky things and I also need something to look forward to. I also find it amusing that the "Welcome" sign is an oxymoron as no one outside of my bubble is welcome inside. 🤣 Materials from Dollar Tree and Joann's and a repurposed grapevine wreath. 🎃🦇🕷️🕸️🦹
.
#halloween #halloweendiy #halloweenwreath #halloweendecor
Follow on Instagram
This error message is only visible to WordPress admins
Copyright 2012-2020. Tanya Maile Hughes. All rights reserved. Please do not copy or reproduce any content from this site without approval and credit. Sewing graphics by katieshoestring and California poppy graphics by DigitalDesignsAndArt

Mrs. Hughes: A retro inspired, vintage garment sewing and plus-size dressmaking blog by Tanya Maile Hughes.

  • About
  • My Closet
  • Tutorials

Copyright © 2021 · Adorn theme by Restored 316

Copyright © 2021 · Adorn Theme on Genesis Framework · WordPress · Log in